Apologies for such a delayed posting, I returned home to the Isle of Man at the end of March for a few weeks, then it was (and is currently) all systems go in the workshops until the exhibition deadline of the 17th of May!
I am always keeping an eye out for inspiration, no matter where I am or what I am doing. Whilst I was sat on my (delayed) flight home, I began to take photographs of the ice on the plane windows as it was getting de-iced.
I found the shapes really delicate and beautiful and began thinking about how I could incorporate it into my work. As my work is themed around structure and geometric shapes, I thought the soft, organic shapes of the ice/snow would work well with the rigor of my pieces.
I began developing the idea of including this style of imagery within my work. Such as etching into metal or printing onto fabric, or perhaps using resist techniques using wax to maintain the organic look.
I will update with more photographs and sketches shortly.
Jennifer is a budding manx designer-maker, aspiring to be a unique jeweller and textile designer.
Friday, 3 May 2013
Sunday, 17 March 2013
Scarf ring design
Apologies for the two week delay on posting. I have been very busy working late nights in the studios and workshops. Here's an update on what I've been up to in the Metal workshop lately!
The scarf ring idea began as a range of samples, created in card and then in copper, using scoring and folding techniques. I loved the idea of creating a large scale piece using geometric shapes.

This idea of scoring and folding metal meant that it would limit the amount of joins I would need in my piece. There would be 2 simple joins as well as 6 smaller joins (to insert the wire to wrap the scarf around)
The scarf ring idea also came about when I was creating my textiles body piece. It is a large sculptural piece using a combination of silk 'sleeves' that are threaded onto plastic strips.
When looking at the silk sleeves on their own without the support of the plastic, I loved the texture of the ruches and how it creates quite an organic shape. I thought this may work well on a larger scale as a scarf and also thought if I incorporated the sharp, crisp edges of my metal work it would create an over all contrasting aesthetic that would compliment eachother quite nicely.

Here is my design sheet, showing imagery and drawings that inspired my piece. The flowing overall shape of the scarf ring was influenced by The Eden Project building's exterior aesthetics and the triangular shapes, as with my first piece is inspired by an industrial building's exterior wall texture.
The scarf ring will be etched with a loose linear design and then silver plated, as to make it out of sterling silver was estimated to be quite costly, which I need to consider as I hope to achieve 5 pieces in my collection.
Saturday, 2 March 2013
Brooch design
My first metal piece of the collection was inspired by a building in Liverpool, I am unsure what the building is specifically, but it looks like it is quite industrial and the flapped walls may work as a sort of extraction as well as an aesthetic.
I loved the exterior texture of the building and thought it was quite unusual and a refreshing change to the average brick or glass buildings. I began drawing from it with stick and ink and creating 3D models from card, to which I created many different designs but this was the one I desired most.
Reflecting back onto my visual research, I believe an element of the building to the right (Lotus Temple, India) influenced my design, with it's large scale petal style design, which shares similar properties with my card models.
I admire the crisp edges, pointed ends and sleek design as a whole. I originally thought it would work well as a pendant, suspended on a long chain around the neck.
The soldering of this piece was the tricky part, and took a lot of tweaking, cleaning and reassembling to get it as perfect as possible. As each triangular piece consists of two parts it was difficult to solder them neatly, trying to preserve the crisp edges and points.
After getting confident with this element of the construct I soon began to problem solve a lot faster and soon found the piece was closer to completion!
As I began to construct the piece from copper sheet it soon became apparent that it may work better as a brooch, rather than a pendant. As if it were a pendant, the wearer would only be able to view the top, and other people would only be able to view the side, so the full potential of the piece wouldn't be fulfilled.
But if it were to be worn as a brooch, on an angle, the piece could be viewed from all angles and I wouldn't have to be concerned about the pendant being too chunky or heavy for a particular chain.
All the piece needs now is more filing, polishing and a touch more etching and then it can be silver plated!
Tuesday, 19 February 2013
Body sculpture design
Recently I've been experimenting with dyeing light habotai silk with natural dyes. Using Alum Mordant as a dye fix. I've bought three dyes to try for the time being: Cochineal, Weld and Logwood which create reds, yellows and purples. From this I hope to follow on to experiment with the more complex Indigo dyeing.
I decided to use natural dyes as my piece's structure base is made with the use of plastic strips usually used for wrapping parcels. So to contrast with this man-made, artificial element I decided that using natural materials in conjunction with this may compliment eachother well.
I chose to use silk as in the early stages of the designing of this piece I was experimenting with shirring chiffon and loved the outcomes, but as I wanted to use natural dyes - silk seemed to be the natural fabric that shared simiar properties to the chiffon, as natural dyes evidently work on natural fabric and fibres.
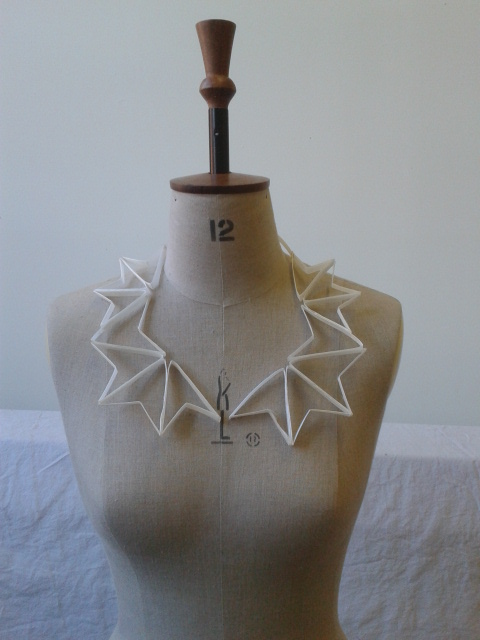
Taking my structural element into context, I began experimenting with triangular components on the mannequin, keeping my metal project in mind also, considering these models as statement neck pieces.
Stage 1
I began taking photographs at different stages of my construction, to perhaps develop certain aspects of the design, and see whether the piece worked better at different stage of the making rather than the end outcome.
Stage 2
Stage 3
Stage 4
Back of the piece, low cut back.
Detail of the front of the piece
Saturday, 9 February 2013
Scoring, folding and more designing of jewellery.
Recently I have been experimenting with scoring, filing and folding metal in order to create a seamless aesthetic for my design. However, this is proving quite difficult, and I have given myself a deadline to have my work finished by (6 weeks from now) in order to spend a great deal of my time perfecting my portfolio, business cards etc, after those 6 weeks are up before my degree show!
I began experimenting with scoring card and creating 3D shapes from a flat piece, without cutting or sticking seperate components.
This was my first initial experiment, which I believe worked quite well. I split a 360° circle into five parts (each 72°) I then began to alter the width, height and angle of the components within the circle.
Circle split into three sections, I like the 3D form this drawing has created. However, I'd like to split it into more than three parts.
I then split the circle into five sections again, but I don't particularly like the outcome as it looks too similar to flowers and petals, which is not my intention when it is supposed to relate to architecture.
Next, I created a development of the first sample I created. This time I developed it by widening the indented triangle at the top of each part.

I like the outcome of this sample as it creates an interesting aesthetic inside the piece as well as on the exterior. However, I am unsure how easily this could be created within metal.
This sample I am not particularly keen on as it is quite 'block-y' looking an is not promoting the aesthetic I am after, as does the sample below.
I created various samples in card, one of which was conjoined triangular shapes in a strip, which I then tried in metal to put the making of it into context. It wasn't too difficult as the copper was relatively thin (approx. 0.4mm) as I had rolled it down to enable quick filing and scoring.
I am quite pleased with this outcome, however I need to experiment and calculate how my design could use this technique in order to make a closed 3D form, rather than in strips - pieced together.
I tried various ways of creating my initial triangle component, the preferrable method for me was creating the pieces separately and soldering them together, as this process created the crispest edges. This is quite difficult as they need to be completely flush. So I will need to perfect this method of making prior to beginning to design my final piece
I then tried folding the scored, filed lines using various stakes and formers to try and get the join pointed and neat, but this was proving difficult and ended up causing metal fatigue.
Below is the scoring and filing method, used for the components in the sample above, however I folded the metal with pliers, hoping for a more precise, crisp line. However this was not the outcome.
Subscribe to:
Posts (Atom)
.jpg)
.jpg)
.jpg)
.jpg)
.jpg)
.jpg)